
Starting a women-centric mom blog is a great idea if you could share pregnancy and childbirth-related challenges and remedies. Additionally, you could enrich your blog with parenting, child-care, or home management hacks.
If you are a working woman, you can make your mom blog even better, as new-age women are looking for tips from seniors to maintain a healthy work-life balance.
Pregnancy, postpartum, and parenthood are some very personal areas where women look for some personal experience, beyond professional advice.
So, before starting a mom blog, be absolutely clear about the relevant experience that you want to share via a blog. Your ideas, thoughts and solutions should be helpful to your audience.
Once you are ready with your areas of interest, you have to shift your focus on building a blog from scratch.
Don’t worry, I am sharing very simple steps on how to start a mom blog. You don’t need to know the technical stuff or understand codes to set up your blog. You too can start a website and configure it yourself in simple steps.
Here are the steps to Start mom or parenting blog.
4 Steps On How To Start A Mom Blog
Step #1. Micro Niches To Choose For Starting A Mom Blog
No wonder, as a mom you are a powerhouse of knowledge and experience. You can share them with a larger audience through a quality blog.
Right from pregnancy to raising kids and advising teens on relationships, but sharing everything that comes to your mind is a recipe for failure.
Instead, you should look for areas where you feel deeply connected, where you have requisite expertise or where you have previous work experience.
The interest area is your niche, because that is what you know and understand better. You will enjoy working and sharing ideas which you are passionate about.
If you are still wondering about the niche, then you can simply choose one from the following list. Make sure you pick the one that is closely connected to your interest area.
The niche ideas related to pregnancy are as under;
- What to expect when pregnant
- Planning, support & saving money
- Understanding natural birth & cesarean
- Care at different baby stages
- Getting rest and sleep
- Managing weight, skin rashes and other health issues
- Preparing for postpartum issues
- Childbirth and mom care
- Adoption (complications and solutions)
- Breastfeeding
- Child’s first year
- Potty training
- Lose weight after baby
- Getting back into shape
- Baby safety
- Books for toddlers
- Mom fitness blog
- Infant care
- Kids / Teen care
- Step-parenting challenges
- Single-parenting tips
- Snack & lunch box ideas
- Healthy eating for kids
- Choosing a school
- Family vacation & travel blog
- Crafts for kids
- Costumes for family and school events
- Kids health issues
- Making rules, responsibility & discipline
- Raising twins
- Finding quality time for kids
- Organizing home, family, and office
- Working women’s health issues
- Parenting advice for the busy mom
- Relationships advice
#5. Combination of Niche Ideas
- Children and finances
- Managing teens and romance
- Gardening with children
- Fashion Blog and beauty blog for moms
- Sports and children
Step #2. Choose Domain Name For Your Mom Blog
After analyzing various mom blogs, I found that their domain names have words like “mom”, “mama” or “mommy” in them. Such domain names are easily relatable to the niche topic.
Use domain name finding tool Leandomainsearch.com to get a domain name idea for your mom blog.
Be patient, because most good domain with the word “mom” has already been taken. You have to dig a little deeper to find a contextually relevant domain name.
The tool returned the following domain name suggestions for the word “mama”.

You can also try looking for a two to three-word name combination that is closely related to your blog niche idea.
However, having a “mom” word in the domain name is not a fixed rule. There are mom blogs with domain having personal names.
If you are still not able to find a suitable domain name then you can start with any domain name.
I too started my blog with the domain name “wisebaniya”, then I changed it to “moneysparkle” but still I was missing the connection.
Finally, I got the right combination in the domain name “CashOverflow”.
The other things which you should keep in mind before finalizing the domain name are:
- To pick up a .com extension: In case the .com is already taken then go for any other extension.
- For a country-specific audience: You should go for that country’s extension. Like for audiences in India go for .in extension and for a US-based audience you should choose .us extension.
- Avoid domain names with hyphens and special characters, that your audience may find it difficult to spell and remember.
- Avoid words that are difficult to spell and hard to remember.
Next, you will require an online space (i.e. hosting service) to host your blog. Hosting is similar to a physical shop where you carry your business.
Step #3. Buy A Hosting
You should avoid free hosting because in free hosting you do not own the site. You are given a subdomain. Which will look like “mysite.yourmomblog.com”. It looks totally unprofessional.
In free hosting, you do not have access to the control panel. On top of that, the server speed slows down as the number of blogs hosted increases.
There will be NO help and support options with a free hosting service. To make things worse, free hosting does not give you the flexibility to design your website and has restricted functions.
It is better to buy hosting space from a safe and reliable hosting service provider having quality customer care support.
I would suggest you to pick hosting services from Siteground hosting. I am using Siteground from last 4 years and I never get any problem from their service side.
Because Siteground gives you safe hosting space on their high-speed servers. Your website loads faster on their solid-state drives (SSD) and free content delivery networks (CDN).
All the shared hosting plans from Siteground are protected from hackers and brute force attacks using HTTP/2 tech and AI security bots.
You get a free SSL “Lets Encrypt” certificate. Additionally, you get assistance from the quality customer care service.
Click this special link to buy Siteground at discounted price
Steps To Buy Hosting From Siteground
Step 1: Go to Siteground website and select ‘Web Hosting”

By purchasing web hosting you get hosting services for your blog on the Siteground’s shared servers.
Step 2: Select GrowBig Plan

Because GrowBig plan is for growing websites. You get enough resources for starting a growing blog, like;
- Hosting more than one website
- Having 20GB of webspace
- The plan can handle up to 25K visitors, at a time.
On the other hand, you can host only one website on the “StartUp Plan” that has limited resources.
The “GoGeek Plan” has higher resources and is best suited for high traffic websites or to support the portfolio of growing websites.
Step 3: Register or Enter Domain Name

You should not get a domain name registered from your hosting service provider for the following reason;
- In the case of website transfer, you may want to shift the domain registrar also, which can be confusing.
- For a portfolio of websites, managing domain at the registrar is better.
- For added security.
Name Cheap is a good option for registering a domain name.
Step 4: Select Plan Period and Complete Purchase

Here, you can select the hosting plan period from 12, 24 or 36 months. Siteground has a fixed transparent price of $5.95 per month irrespective of the plan period.
Next, you will require a WordPress setup to see your blog live on the internet.
Step #4. Complete The Technical Steps
Installing WordPress, themes, and essential plugins will make your mom blog live and functional.
You should not worry about the technical stuff. Even a layman can complete the steps watching the following video.
You too can set up the whole process in simple steps.
Install WordPress
You can create beautiful websites by installing WordPress’s free content management system.
You just need to go to the control panel and click on “Install WordPress” in order to create a blog.

Some hosting services provide a pre-installed WordPress, but that entirely depends upon your hosting provider.
WordPress is used for creating web pages, posts and adding images. Further, WordPress lets you install themes and plugins to help you customize and enhance the appearance of your blog.
Setting Themes
Themes include layout, style elements and color schemes. Themes decide the overall look and feel of the website. I would suggest you to always use best SEO wordpress themes for your blog.
Few examples of themes for Mom Blogs are;
- Daisy
- Pretty Chic
- Family Board
- The Essence
However, you should not waste precious time in finalizing the theme.
Instead, you should pick up a free theme or any reasonably priced theme and focus more on other important things like content & growing your blog.
Make sure that whatever theme you choose, the website should;
- Have a responsive design
- Open with the help of any browser
- Be easy to navigate
- Have a professional look with proper structure
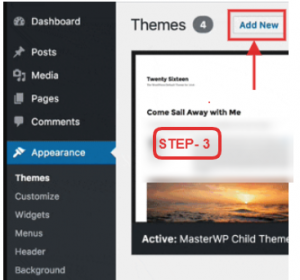
Steps to Install a Free Theme
You need to go to the dashboard> “Appearance” menu and select the option theme.
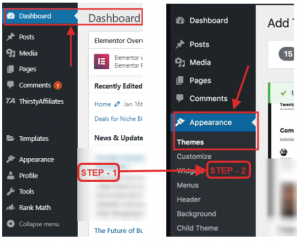
Next, you can select one from the list of themes and click on add new.
Steps to Install a Paid Theme
- Download the theme file from the theme website
- Click on upload theme
- Choose the theme file
- Click on install
Once you are done with the installation, then you have to click on the “Activate” button to make the theme functional.
Installing Necessary Plugins
Plugins give you the much needed additional features. They are helpful for having extended functionality like protection against spamming, incorporating SEO features, creating an e-store and many more.
Further, as you grow you may require advanced plugins like email marketing or affiliate marketing plugins.
In the initial phase, you can start by installing only necessary plugins, the list of which is as under;
- Akismet
- JetPack
- Yoast SEO
- TinyMCE Advanced
- WP Smush
- Shortcodes Ultimate
Check out – how to start lifestyle blog
10 Different Ways To Monetise Your Mom Blog
Affiliate marketing is the number one choice for most of the mom bloggers because you get the flexibility to promote a lot of products. But, you should use multiple methods to monetize your mom blog.
#1. Advertising
The empty website spaces on the right side and bottom of the web pages can be used for advertising. You can use Google Ads like the one below.
Google pays you for displaying ads through the AdSense program. You earn money when visitors view or click those ads.
The earnings can be in the range of $0.5 to $10 depending on the geographic location. Generally, the US location gets you a higher earning in comparison to the other location.
But, you do not have any control over the type of ads getting displayed.

Display Ads divert the blog traffic and make your blog look unprofessional. Further, they are also responsible for slowing the website’s upload speed.
#2. Sponsored Posts
Businesses and brands look for bloggers to promote their products and create brand awareness.
You can do a sponsored post for such businesses. This requires writing reviews, testimonials, descriptive content and brand mention in posts.
An example of a sponsored post is as under;


You should make sure that the sponsored post is truthful; your personal opinions are honored and not suppressed just because you are being paid.
While doing sponsored post do not project any brand or product to be the way it isn’t. If you do then your audience will lose faith in you and doubt the credibility.
#3. Affiliate Marketing
In affiliate marketing, you promote the products and services of others through your blog. In the case of a sale, you receive a commission from the merchant.
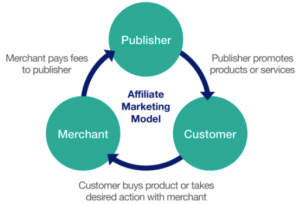
Mom blogs have a wide range of products to promote right from home, food blog, clothing to baby and kid usage products. An example of a blog using affiliate marketing to monetize is below;

The best idea is to apply to different affiliate programs. Like;
- ShareASale
- Amazon Affiliates
- FlexOffers
- Rakuten
- Awin
Once you’re accepted, log in to the website of the affiliate company and copy the link of the product or brand you want to market.
When you make your post about the product or brand on your blog, you will insert the link so that your audience can visit the site through the link and then make a purchase.
#4. Sell Your Own Products
If you can locally produce small daily use items, handmade soft toys, signature handkerchiefs or crafted bead jewelry then you can sell them through your blog.
For example, the blog “Wellness Mama” sells its own range of daily essentials.


Selling your own products helps in creating your own brand and gets you a higher amount of profit. But you also need to manage inventory and customer care activities.
The good thing is that you can use Amazon FBA to manage your shipping and inventory. You also have the option to outsource the customer care function.
#5. Coaching and Consulting
Your expertise in parenting, counseling can help you monetize the blog. Like what you find on the 24/7 mom’s blog.

Through the blog, you can find clients and help them with your coaching & consulting services on topics like;
- Relationship building with teens
- Parenting
- Childcare
#6. Selling Guides and E-Book
Creating digital info-products like guides and ebooks may take some time and effort. But, an e-book can go a long way in generating a stream of cash flow.
Like what Dr. Laura is doing on her blog “Aha! Parenting”

You too can create an e-book on topics like;
- Children storybook
- Healthy lunch recipe book
- Mom health checklist
- Travel planner
#7. Selling Own Services
If you can spend some time, then there is a good opportunity to sell your services through your mom blog.
Like what Lindsey is doing through her blog “Motherrisingbirth”.

Services that you can sell are;
- Doula Services (trained non-medical companion for support during childbirth)
- Consulting service for solo parenting
- Coaching new moms/ working moms
- Content writing for other mom blogs
- Photography services
- Travel planning services
#8. E-Stores
E-stores can be integrated with your WordPress blog using the WooCommerce Plugin.
Through an e-store, you can sell different products aligned to your niche topic. Products range from clothes, jewelry, women accessories, beauty, and healthcare products.
My Little Moppet store is an example of an e-store;

Before you monetize your blog using e-store make sure that the products are related and are beneficial to your audiences.
#9. Online Courses and Classes
As a mom, you have experience in handling kids, home organization, setting routines, helping children learn various arts. You can very well help other moms and children do that by offering online classes.

Few examples of online classes that you can take are;
- Online art classes for kids
- Language, craft, relationship classes
- Home organization hacks
- Summer classes
- Classes on how to start a mom blog
#10. Selling Audio and Videos
You can use your knowledge, experience, and expertise for creating helpful audios and videos for your audiences.
Like the videos bundle that you can find on the blog “Lactation Link”;

You can earn money selling videos on;
- A step-by-step exercise for postpartum recovery
- Online videos to organize each part of your home
- Motivational videos for mom/ kids
You can even sell audio products like Dr. Laura is doing through her blog “Aha! Parenting”;

Get First 1000 Visitors In 30 Days on Your Mom Blog
You can pull traffic to your mom blog in two different ways; through social media channels or from Google.
It will take some time for your mom blog to rank in the Google search. Till then you can use social media channels to get traffic to your blog.
#1. Get Visitors Through Social Media
You should explore various social groups and forums to find initial audiences. In the beginning, you need to provide value to the group by helping people and solving their problems.
Then only you can expect things in return. Your primary aim should be to build relationships and not spamming the group with your blog promotion.
For example, you can use Instagram to find an initial audience.
On Instagram, you can explore relevant groups and communities using hashtags. A simple way to find a community is to search Instagram with “#community”.
For example, you get the following results when you type “#mom community”;

You can engage with the audiences of popular blogs, communities, niche groups and competitors by following them, liking & commenting on their photos. The chances are that some of them will follow you back and visit your blog.
#2. Using Email Marketing
Email IDs are the best for building an engaged audience base. You should use email IDs to reach like-minded people in a personal manner.
Here is the foremost thing, you can help your audience through personalized emails and build credibility. In return, then you can ask politely to share information about your mom’s blog.
#3. Publish Regularly
While you are promoting on social channels, do not forget to maintain the content publishing frequency. You should cultivate the habit of writing and publishing content regularly for your blog.
Once you have the volume on your website, Google will start indexing your pages and will start sending organic traffic to your blog.
Conclusion
Your personal experience as a mom is an asset if you could express them effectively through your blog. People love to read personal experience and use it in their own way.
That will help your readers on their journey to pregnancy, childbirth, raising kids and managing home effectively. Above, all sharing knowledge in itself is highly satisfactory.
Learning Resources/ Further Readings


